Tuesday, October 28, 2014

Halloween Cakes: Fondant-Covered Pumpkin Cake

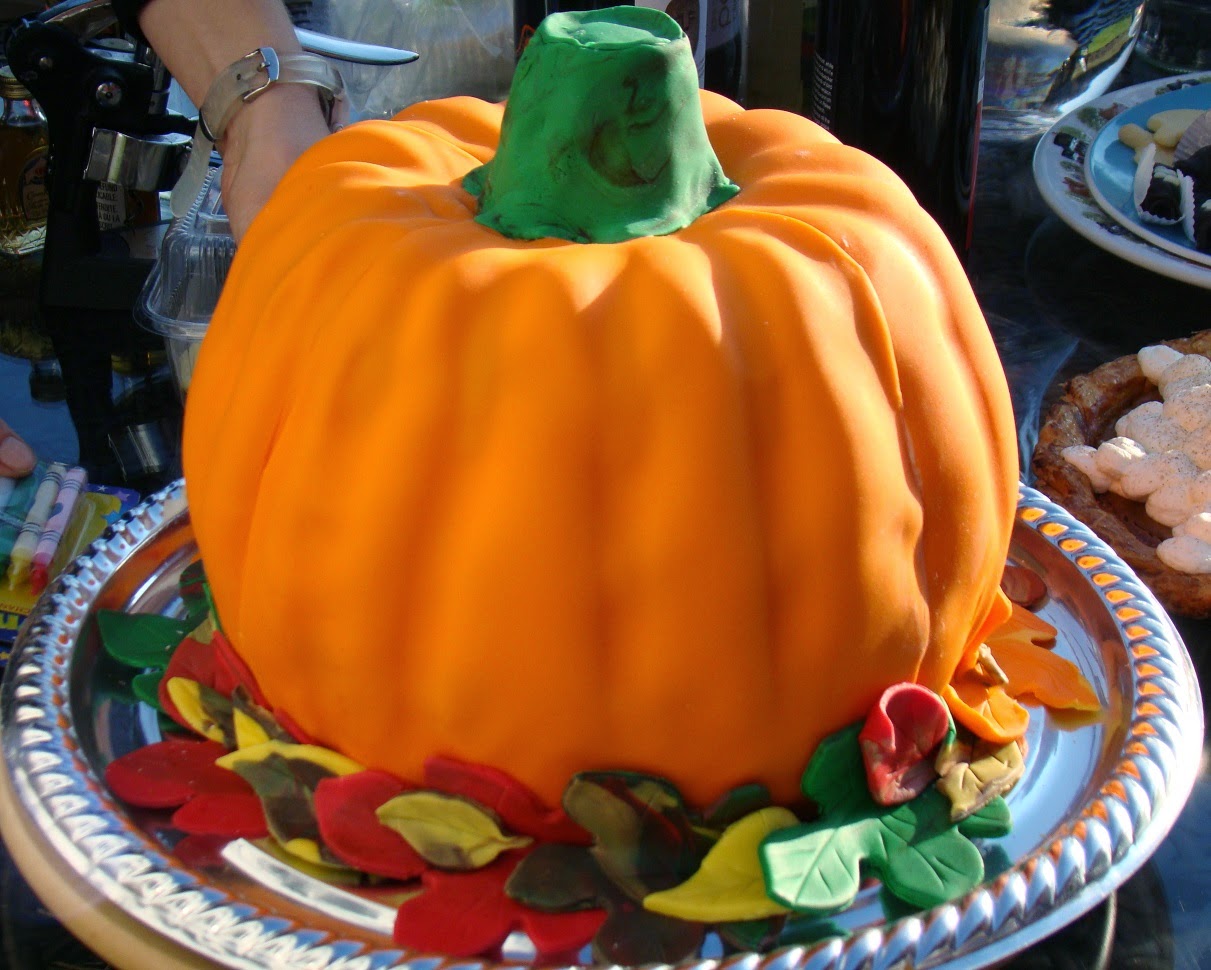
There are just a few days left to make the Halloween Cake that you've been stressing about.  Well, stress no more!  Here is a simple way to make a pumpkin-shaped cake.

This Fondant-Covered Pumpkin has four layers of moist vanilla-chocolate chip cake inside and pumpkin-spiced buttercream. It was covered in Duff's brand of orange fondant, which both tastes great and has really good coverage (and it NEVER cracks! I am not paid to say these things, I have just tried so many types of fondant and been disappointed so many times, but Duff's truly is the best and has the most 'awesome' colour range. Plus, I am a long-time fan of the show Ace of Cakes and know that if Duff recommends it, it must be good!).


How can you make a pumpkin-shaped cake?

There are two ways:

1. Bake a cake in two bundt pans and then flip one upside down, ice in between and then press together, matching up the grooves.  Ice the outside and cover with fondant.

2. Bake four thick layers of cake in 8" or larger pans. Layer with buttercream, and then carve the whole stacked cake into a pumpkin shape. This is not as easy as option one, but you can add more buttercream this way, and it is the best option if you do not own a bundt pan! 

For the stem, make a cupcake and place upside-down in the top of the 'pumpkin' or shape rice treats into a stem shape, then cover with green or brown fondant, or melted chocolate.

For a jack-o-lantern cake, use black fondant to cut the mouth, eyes and nose. Stick them on to the front of the cake with a tiny amount of water onto the back of the fondant.

Happy Halloween!
Tuesday, October 21, 2014

Halloween Cakes: Fondant-Covered Witch Hat Cake!


Halloween is fast approaching and it is time to plan Halloween party treats, and cakes for kids who are celebrating birthdays during the spooky season.  This witch Hat Cake was made for a Halloween party at a local daycare.  The kids loved eating the tray of spider chocolate truffles, as well as this carved, cackling cake.

What's Inside? Chocolate cake with chocolate buttercream!

How to make it:
First you need black and orange fondant (in Canada, you can find some at the Bulk Barn or Michael's, but the best brand really is Duff's).

To make the hat (2 ways):

1. Make a cake batter and pour it into large and small sizes of cake pans (i.e. a cupcake pan, a 3" cake pan, a 5" cake pan, a 7" cake pan and an 8" cake pan), then once baked, stack your cakes and layer with buttercream, so that the smallest cake is on top and the largest on the bottom.  Then carve your cake into a cone shape. 

2. Make Rice Krispy Square treats, but shape them into a cone before they cool, instead of the usual squares. Carve it down a little for even edges if necessary. Cover with a little buttercream and cover with black fondant.

To make the bottom of the hat:


Make a large round cake (I used a 14" round pan, but that feeds 35 or more people, so you can use an 8" or 10" or whatever you like depending on your party size). Roll out a large piece of black fondant and cover the cake with it, but let your edges stay long and ruffle like a hat (this is easier than trying to cut a straight edge anyway!).

To make the 'buckle':

Use orange fondant and spray with edible gold spray (I buy this at Michael's or online at Golda's Kitchen) or brush on edible gold shimmer dust.

To make the spiders:

I used my signature toffee mix (with a round chocolate truffle inside) to make the spiders, but you can make spiders out of black fondant by rolling round balls of black fondant and then little strips for the legs.  A dot of water will act as adhesive (once dry) to secure the legs to the spiders.

Good luck with your Halloween Party!

Thursday, October 2, 2014

Eight-Layer Nutella Buttercream Cake with Hazelnut Milk Chocolate Ganache


This cake is nearly one-foot tall with rich Nutella Buttercream icing layered between eight layers of rich chocolate cake. Crumbled pieces of milk chocolate are sprinkled between each layer and it is topped with Hazelnut Milk Chocolate Ganache.

A cake this tall is certainly a celebration cake! You need a large plates to serve it (and be sure to yell "timber!" when you let it fall on the plate); your guests will be impressed with every slice.

Instructions to Make an 8-Layer Cake:
  1. Simply bake a moist chocolate cake recipe (I can' share my business recipe, but you can use your favourite or a cake package mix - you'll need at least 2 packages) and spread just enough batter on 2 parchment-lined 8" round pan to cover the bottom (the batter should not be higher than 1/4 to 1/2-inch once spread and levelled in the pan). 
  2. Bake only for 9 or 10 minutes until a knife comes out clean. 
  3. Pop them out onto wax paper to cool, scrape off your parchment, re-butter your pans and do this 3 more times until you have 8 layers.
Instructions to Make Nutella Buttercream Icing:
Add 2 cups of Nutella to your favourite buttercream icing recipe. Use this recipe, but add four cups of Nutella and simply choose all butter or all shortening instead of a mixture of both, if you prefer.  You will have some icing left over for Nutella cupcakes.  Top with pieces of toast for that true Nutella experience!

This cake is also gorgeous when milk chocolate shavings are pressed into the sides all around the cake.  But you'll need a lot of chocolate shavings for that!

Wednesday, October 1, 2014

Fall Leaves Cake with Buttercream 'Bark'

For this rustic wedding cake, a butterscotch buttercream icing was the highlight, which gave the cake a rougher bark-like appearance, and a delicious flavour. It rested on a cake plate and on a cut of a tree as the cake stand. The 250 cupcakes that matched the cake were also displayed on several different sizes of tree cuts that surrounded the cake.

To get the rustic appearance, I doubled the amount of icing sugar in my white buttercream icing recipe to cause it to come out of the decorator bag a little thicker and drier. And instead of vanilla, I added a little butterscotch sauce to it to add a sweet and delicious flavour. To get the rough texture, I used a fairly common decorator tip, Wilton #199 Open Star, but a Basket Weave tip may also accomplish the same effect.

What's inside?  The bottom tier highlighted a Butterscotch Buttercream icing, layered with milk chocolate chunks and moist chocolate cake. The top tier had Peanut Butter Buttercream and milk chocolate chunks.

The cupcakes came in three flavours: Butterscotch Buttercream, Peanut Butter Buttercream with Milk Chocolate Ganache, and Chocolate Buttercream.

Learnings and Tips:  I used fondant to make the leaves because I required 250 of them for the cupcakes and for the overall price of the cake display, expensive gumpaste (which dries hard) was not feasible.  Fondant leaves normally hold up very well, but in the unusually hot and humid early Fall weather, the fondant wilted significantly.

It would have been fine if the wedding location had been air-conditioned, but alas, it was not.  In future, I will recommend that leaves be made of gumpaste for cupcakes at a higher price, or smaller, mini leaves be used on the cupcakes if the weather may be humid.