Thursday, July 30, 2015

Happy National Cheesecake Day!

Okay, so I'm pretty sure that there are several 'National Cheesecake Days' throughout the year, and who knows what nation we are talking about, really.  But I thought I'd celebrate the day simply because it's a) trending on Twitter and b) The Cheesecake Factory and a few other American restaurant chains seem to be celebrating as though today is THE most important day of the year.

So today I celebrated in my commercial kitchen by making, slicing and delivering two delicious cheesecakes to Buoy's Eatery in Gore Bay, Ontario (that's on Manitoulin Island in Canada, and by the way, it is the largest freshwater island in the world).

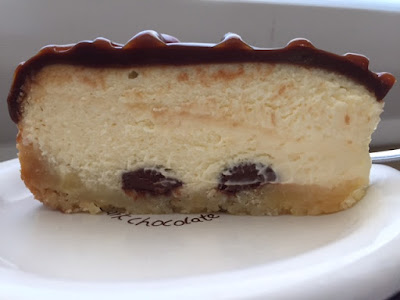
I make a mean Bailey's Cheesecake, which has an all-butter shortbread crust, vanilla cheesecake with milk chocolate chunks, and a Bailey's chocolate truffle topping.  Oh so good.  Enjoy with your eyes now....


I also make a Spicy Turtle Cheesecake, with a from-scratch brown sugar cookie crust, milk chocolate cheesecake filling, and a milk chocolate truffle ganache.  Oh, and the whole thing is topped off with organic semi-sweet and milk chocolate chunks, pecans, caramel sauce and cayenne pepper. Oooh that's spicelicious!


So isn't it time to visit Manitoulin Island and Buoy's beautiful waterfront patio restaurant?

Happy #NationalCheesecakeDay to you!

Thursday, July 23, 2015

Flourless Chocolate Cupcakes: Maple & Sea Salt with Maple Buttercream


I was making several Flourless Dark Chocolate & Maple Cakes the other day, and found that I had enough batter left for one more cake. But instead, I decided to turn them into flourless cupcakes. I managed to make about 10  cupcakes with the batter from my maple cake recipe (get the recipe by clicking here).

For cupcakes, the only change is to bake them for no more than 20 minutes each.  This will result in a fudgy, delicious cupcake.  And since it is flourless, and mostly made of chocolate, they will not rise.  So I realized that something more than simple chocolate ganache was needed on top to decorate these babies.  They definitely needed some height. So I added a half cup of maple syrup to a vanilla buttercream recipe.  So after adding a layer of ganache (also provided in the maple cake recipe here), I then I topped the whole thing with chunky sea salt. Delicious!

Psst: you can make your gluten-free friends happy with this recipe, and it is so good that no wheat-lovers will complain about it being gluten-free. Happy Baking!

Monday, April 27, 2015

Icebox Cake Makes the Perfect Cookies and Cream Birthday Cake

This birthday cake is made up of several 'icebox cake' stacks and then decorated in a whipped cream cheese icing. The best part is that it is a no-bake cake!  No oven is required and no cake pan dishes to wash - which means you can make the whole thing in 30 minutes or less.

So what is an icebox cake or stack?  It is a cake made of several wafer cookies layered with whipped cream between each to form a log.  It can be stacked up several wafers high, or the stack can be laying on its side to form a log.  Learn more about it here.

For Americans, Icebox Cakes are made with Nabisco Famous Chocolate Wafers. But in my region of Canada, we use Mr. Christie's Chocolate Wafers to make this cake, which can nearly always be found in the cookie section of the grocery store.

The beauty of these wafer-and-whipped-cream cakes is that the cookies soften in the whipped cream so you truly get a delicious concoction that is easy to slice and has a cookies and cream flavour.

Here is how to make it...

Recipe: Cookies and Cream Cake made with Icebox Cake Stacks

 Time: This no-bake cake takes about 30 minutes and
no oven time! You must, however, wait 6 hours or overnight before serving it to let the cookies soften - so make one day in advance or first thing in the morning the day of your party.

Make lightly sweetened vanilla whipped cream:

You need...
  • 3 cups of whipped cream.
  • 3 tbsps. of agave, coconut sugar or icing sugar (I used organic icing sugar)
  • vanilla bean scrapings or real vanilla extract.
Instructions...

1. Whip the 3 cups of whipped cream.

2. Add the sugar and vanilla bean or real vanilla extract (I used a little of both) just before the whipped cream starts to form peaks.  Stop beating when light peaks form and it is still shiny (if it starts to look even slightly lumpy, stop beating!)

Make the icebox stacks:

You need...
  • The sweetened whipped cream you just made
  • 1 box (200g or about 7 oz) of Mr. Christie wafer cookies.
Instructions...

1. Make 8 icebox stacks by placing a spoonful of your whipped cream onto each chocolate wafer cookie, then do the same to 6 more cookies for every stack.  The entire box of Mr. Christie Cookies can make 8 stacks plus one cookie. 

2. Place your 8 stacks in a round flower shape.


3. Lightly cover the whole cake in your remaining whipped cream and push some down into the spaces between the stacks. Place in the fridge while you prepare the outer icing.  You can just use your remaining whipped cream to decorate the cake.  Or you can do the following:

Make Whipped Cream Cheese Icing:

You need...
  • 1 cup of whipped cream (the remaining amount from what you made above will be enough)
  • 1 package of cream cheese, softened (250 g)
  • 1/3 cup of granulated sugar (I used organic, unbleached sugar)
  • Vanilla Bean or natural vanilla extract

Instructions...

1. Beat the cream cheese until softened (1 minute), turning off to stir with a spatula occasionally to incorporate all of it.

2. Add the sugar and beat until the whole mixture is soft and fluffy.

3. Pour in half of the whipped cream and beat for a few seconds to incorporate.  Then stir by hand to fold in the remaining whipped cream.

4. Place in a pastry bag with a Wilton 21 cake decorator tip (or go large and textured with a Wilton 2D tip) on the end.  Take your cake out of the fridge and then using your pastry bag, put the icing on the cake by making swirling motions, starting from the center of the 'swirl' and working out. First make circular swirls on top of each cookie in the stack, then fill in the spaces around the outside with swirls and rosettes of icing.

5. Use sprinkles, chocolate flakes, cookie crumbs, or candy pearls to decorate the cake however you like.

6. Let the whole cake set in the fridge for at least 6 hours, but up to 24 hours before serving is good too. Do not serve immediately after making it or the cookies will not have time to soften in order to cut the cake.

This cake is totally delicious, so enjoy!

Sunday, April 12, 2015

Sea-Salted Butter Pecan & Caramel Milk Chocolate Cake (Flourless/Gluten-Free)

Buttery, rich and delicious. That is the best way to describe this melt-in-your mouth masterpiece. I made mine without added sugar, for a more European-style dessert, but you can add sugar to the recipe to make it a bit sweeter (see ingredients list below).

So how did this creamy caramel sensation come about?  Well, I was perusing the chocolate section in Bulk Barn the other day, and found that they had a new bin of caramel-flavoured milk chocolate pieces. Click on this link to find out where to buy these and the ingredients, as well as my review of the taste.

You can also use Valrhona's Caramelia chocolate couverture for this recipe. Learn more about this chocolate product here.

Here is the recipe:

Recipe: Sea-Salted Butter Pecan Caramel Milk Chocolate Cake (Flourless)

You need:
  • An 8-inch springform cake pan, lined with parchment paper (or regular cake pan, but be sure to line with parchment paper) and buttered across the bottom and up the sides.
  • 10 ounces of caramel-flavoured milk chocolate
  • 1/2 lb of butter (2 sticks) chopped into 1" pieces + an extra tsp for greasing the pan
  • 4 eggs
  • 1.5 tsp sea salt
  • 1/2 cup sugar (optional)

For the topping:
  • 5 ounces caramel-flavoured milk chocolate
  • 1/2 cup whipping cream
  • Dulce de leche caramel sauce (I used the Canadian President's Choice brand from the grocery store because it is thick enough to decorate with)
  • Roasted pecans (roasted in the oven at 350 for about 15 minutes, sprinkled with a little salt and olive oil)
  • A pinch of chunky sea salt

To make the cake:

  1. Preheat the oven to 350.
  2. Melt together the butter and chocolate in a bowl over a double boiler (a pot with 1" of nearly simmering water), while stirring constantly.  Or in a microwave-safe dish for 1 minute.  Stir until fully melted.
  3. If you are adding sugar, add the 1/2 and stir before adding the eggs.
  4. Add all four eggs at once and mix with a hand mixer or immersion (handheld) blender.
  5. Add the salt and mix again for just a few seconds.
  6. Pour into the prepared pan.
  7. If using a springform pan, you may want to place your cake pan on a cookie or pizza pan prior to baking. Bake on the middle rack for about 25 minutes.  The middle should look less cooked than the outside edges, for a nice smooth centre, although not jiggly. Let cool in the oven for 15 minutes with the door open.
  8. Let cool on the counter for 1 to 2 hours, then refrigerate until cooled. (about 2 hours in the fridge)
  9. Once chilled, invert onto a serving plate and prepare your topping.

To prepare the caramel-flavoured milk chocolate ganache topping: 
  1. Place your 5 ounces of chocolate and the cream into a microwave safe bowl. 
  2. Melt together for 55 seconds in the microwave.  Remove and stir until smooth.  Microwave for 5 second intervals until it can stir smooth. 
  3. Pour the mixture over the cake and spread to the edges.  Either push it so it drips over a little all around the cake, or push more over the edges and use a small offset spatula to smooth out the sides.
  4. Chill for 30 minutes until cooled and set.
  5. Top the cake with your roasted pecans and sprinkle lightly with chunky sea salt. Place your caramel sauce in a small plastic snack bag or decorator bag and cut just the tip off.  With swirling motions, decorate the top of the cake as you please.

Chill completely before serving.  Slice cold with a hot knife (heat under hot water, but dry with a paper towel before cutting).

Enjoy the buttery goodness!


Top with extra ganache set at room temperature for 8 hours and squeezed through the corner of a plastic bag. Sprinkle sea salt and pecans and add caramel sauce for delicious sweetness!

Wednesday, February 18, 2015

Simply Baked Oven-Safe Disposable Baking Pans....for baking flourless chocolate cake!

It is cold here in Canada right now. Really cold.  In fact, it is absolutely frigid. And when the temperature dropped to well below -20 degrees Celsius the other day, the pipes in my commercial kitchen froze for a few days. So I did paper work, writing and a few other non-baking tasks until I couldn't take it anymore. I had to bake something! So I thought it was the perfect time to make a cake in a disposable cake pan to save me from doing too many dishes once the water came back on.

So I pulled out the Simply Baked disposable baking pans that I found at HomeSense over the Christmas holiday. I made one of my signature Flourless Hazelnut Dark Chocolate Truffle Cakes to see how it would bake in the pan.  You can find the recipe here. And truthfully it baked pretty well and rather quickly. 

I made two cakes and used two Simply Baked pans. With one, I decorated and served the cake inside of the pan.  With the other, I flipped the cake over onto a plate. Unfortunately, a little bit of the lower edges were left in the pan.  I'm not sure if it is because the cake can be a little sticky or if the edges dried out a little because the pan was made of paper.  I think next time, I would still have to line the pan with a round of parchment paper the way I do with metal pans in order to extract it.

Overall, my experience with these disposable baking pans was good. It was nice that the pan looked pretty enough to serve the cake in, and it made it easy to carry over to my neighbours for a house party last night. Also, the pan's edges can be pulled off fairly easily so that you can slice and serve the cake without messing up the first piece. What's more, clean-up was a breeze. And the funny thing is, as soon as the cake was made, the pipes thawed and I had water! 

According to the website for the Simply Baked brand, which is http://simplybaked.us, the pans are oven and freezer safe, as well as disposable and bio-degradable.  The company also offers square cups and metallic petite cups in a variety of cute designs.

Because the pan was so pretty, I also made a delicious no-bake dark chocolate 'fudge' and poured it into one of these disposable pans. I thought the pan was pretty, and it was a nice way to wrap up the fudge because I was giving it to someone as a gift.

There are three pans in each pack, so I am glad that I purchased two packages!

Please note....
I realize that this article reads a little like an advertisement, but I have not been paid, encouraged or given incentive of any kind to write about Simply Baked cups and pans.  I just saw them in HomeSense one day, tried them and decided I should share because I liked them so much!

Tuesday, January 6, 2015

Galette des Rois - Cake of Kings

See recipe below...

On Twitter this morning, I was reminded of a cake that I had not seen in 10 years, a Galette des Rois (King's cake).  Since I have not been back to France since the year that I spent studying there,  I had forgotten about this cake and how it is served with a crown on top, which I saw at several boulangeries in France. I remember how not-so-sweet, but oh-so-buttery it was (as all French desserts are).

And what I learned on Twitter from the My France website, was that today is the precise day that a Galette de Rois should be eaten!  So I decided to make one today.

Epiphany is celebrated on January 6th,  which corresponds to the day baby Jesus was presented to the Three Wise Men, and consequently it is the date of the baptism of Christ (ref).

So the cake is not only served with a crown on top, but a toy or figurine should be tucked inside, and whoever receives it, gets to wear the crown and 'be king for the day'. That person also has to provide the cake the following year.

I searched online for recipes and ended up using a mix of two Galette des Rois recipes, from BBC Good Food and Food Network. I modified the recipes (see mine below) because I don't like almond extract, and I didn't have apricot jam on hand, but I felt like dark rum fit this traditional European style of cake.

Both recipes called for store-bought puff pastry, which I did not have on hand, so I looked for a recipe and ended up using the one at this link: http://www.foodnetwork.com/recipes/quickest-puff-pastry-recipe.html which worked out beautifully - with the egg wash on it, it was flaky, layered and, well, a perfect puff pastry.

In my household, this cake was an absolute success - the kids loved it, my husband loved it and I certainly enjoyed a large piece myself (despite those nagging thoughts about getting fit in January lingering in my head).

So here is the recipe that I made, modified from the two above:

Recipe: Galette des Rois

Ingredients for the almond cream ('frangipane' cream):

1 cup of butter, softened
1 cup of ground almonds
3/4 cups sugar
4 tbsp. of all-purpose, unbleached flour
3 eggs
1/8 tsp sea salt
1 tbsp. dark rum

Puff pastry: store bought or find a great recipe here.

Instructions:


1. Preheat oven to 450 degrees.

2. With a stand mixer, mix all the ingredients for the almond cream until just blended.

3. On a slightly floured cold surface, cut two 9" circles (about the size of round dinner plates, or use a pie plate or the bottom of a springform pan flipped upside to cut your circles). Put one of them on a baking sheet lined with parchment paper.

4. Brush one inch around the edge of the circle with egg wash (beaten egg yolk). Spread half of the almond cream on the center (leaving the 1" edge without cream) and place the second circle on top. 

5. Press all around the edges to glue them together with a fork. Press softly in the center to evenly spread the filling.

6. Decorate the galette with a knife, and make any design that you like.  Search on Google for Galette de Rois images to assist in design, or simply make curved lines to the centre as I have - it baked very well and looked quite nice.

7. Brush the top of the pastry with egg wash, but DO NOT get any on the sides that you pressed with the fork.

8. Put the galette in the centre of your preheated oven and bake for 15 minutes, then turn the oven temperature down to 350 degrees and bake for 25 more minutes. Keep the cake in the oven and simply pull the rack out to sprinkle with icing sugar, then bake for five more minutes. 

Serving:
  • Serve warm or at room temperature with a crown on top.
  • Tradition says that you should cut enough pieces in advance for every person at your dinner, plus one piece, which is reserved for the 'first pauper to appear at the dwelling' (ref). You can also tuck a toy inside one piece for the tradition of King for the day.
Storing:

Do not wrap this cake in plastic wrap, or you will lose the wonderful flakiness of the pastry.

Remaining Almond Cream:

You can use the second amount of cream for a second Galette des Rois, if you have enough dinner guests (i.e. more than 8) or if you have enough puff pastry. Alternately, place the almond cream on any left over puff pastry and sprinkle on some raisins, then roll it up and cut one-inch rounds (like cinnamon rolls) and you will have an excellent Pain au Raisin to bake in the oven for 15 minutes at 375 degrees F.

Next year, I absolutely MUST make a chocolate Galette des Rois, like this one: http://www.ledicodesfilles.com/tag/galette-des-rois-au-chocolat/.

Saturday, January 3, 2015

Festive Chocolaty Cake with Chocolate Pinecones


I made a very festive, holiday season-style cake for a customer who was having a New Year's Eve party. This chocolate cake was very rich and covered in a semi-sweet dark chocolate ganache (a cream and chocolate mixture), and it was decorated with vines and leaves made of dark chocolate toffee, and chocolate truffle 'pinecones' for a festive flair.

What's inside?
My special Raspberry Dark Chocolate Truffle Cake recipe was used for the base of the cake (sorry, I can't share, it's a business secret and served at a local restaurant, but you could use any of the Flourless Chocolate Cake recipes from my chocolate blog site here under the 'Chocolate Brownies and Cakes' section).

Inside the pine cones I used pinecone-shaped dark chocolate mint truffle, otherwise called chocolate paté.  You can find the recipe here - choose any of the three flavours of patés to put inside, just make sure you cover them with a good coating of dark chocolate ganache so you can't see the white or milk chocolate when you cover your paté in chocolate chips to get a pine cone look. A flatter chocolate chip works well (check at a bulk store for flatter-shaped chips, like Callebaut brand), but any will do.

How to make the Pine Cones:
Simply shape your paté on a half-egg shape, then cover in a coating of ganache. Let the ganache set in the fridge for a half hour. Press chocolate chips into it in straight rows across the 'pine cone'. Use bigger chips at the back and smaller at the thinner end. If you make the shape more like a sphere (i.e. with a plumper middle) you will have something that looks like a hedgehog.  Feel free to use the same method to make hedgehogs instead!

Happy Baking (or should I say 'Caking') in 2015!