Wednesday, February 18, 2015

Simply Baked Oven-Safe Disposable Baking Pans....for baking flourless chocolate cake!

It is cold here in Canada right now. Really cold.  In fact, it is absolutely frigid. And when the temperature dropped to well below -20 degrees Celsius the other day, the pipes in my commercial kitchen froze for a few days. So I did paper work, writing and a few other non-baking tasks until I couldn't take it anymore. I had to bake something! So I thought it was the perfect time to make a cake in a disposable cake pan to save me from doing too many dishes once the water came back on.

So I pulled out the Simply Baked disposable baking pans that I found at HomeSense over the Christmas holiday. I made one of my signature Flourless Hazelnut Dark Chocolate Truffle Cakes to see how it would bake in the pan.  You can find the recipe here. And truthfully it baked pretty well and rather quickly. 

I made two cakes and used two Simply Baked pans. With one, I decorated and served the cake inside of the pan.  With the other, I flipped the cake over onto a plate. Unfortunately, a little bit of the lower edges were left in the pan.  I'm not sure if it is because the cake can be a little sticky or if the edges dried out a little because the pan was made of paper.  I think next time, I would still have to line the pan with a round of parchment paper the way I do with metal pans in order to extract it.

Overall, my experience with these disposable baking pans was good. It was nice that the pan looked pretty enough to serve the cake in, and it made it easy to carry over to my neighbours for a house party last night. Also, the pan's edges can be pulled off fairly easily so that you can slice and serve the cake without messing up the first piece. What's more, clean-up was a breeze. And the funny thing is, as soon as the cake was made, the pipes thawed and I had water! 

According to the website for the Simply Baked brand, which is http://simplybaked.us, the pans are oven and freezer safe, as well as disposable and bio-degradable.  The company also offers square cups and metallic petite cups in a variety of cute designs.

Because the pan was so pretty, I also made a delicious no-bake dark chocolate 'fudge' and poured it into one of these disposable pans. I thought the pan was pretty, and it was a nice way to wrap up the fudge because I was giving it to someone as a gift.

There are three pans in each pack, so I am glad that I purchased two packages!

Please note....
I realize that this article reads a little like an advertisement, but I have not been paid, encouraged or given incentive of any kind to write about Simply Baked cups and pans.  I just saw them in HomeSense one day, tried them and decided I should share because I liked them so much!

Tuesday, January 6, 2015

Galette des Rois - Cake of Kings

See recipe below...

On Twitter this morning, I was reminded of a cake that I had not seen in 10 years, a Galette des Rois (King's cake).  Since I have not been back to France since the year that I spent studying there,  I had forgotten about this cake and how it is served with a crown on top, which I saw at several boulangeries in France. I remember how not-so-sweet, but oh-so-buttery it was (as all French desserts are).

And what I learned on Twitter from the My France website, was that today is the precise day that a Galette de Rois should be eaten!  So I decided to make one today.

Epiphany is celebrated on January 6th,  which corresponds to the day baby Jesus was presented to the Three Wise Men, and consequently it is the date of the baptism of Christ (ref).

So the cake is not only served with a crown on top, but a toy or figurine should be tucked inside, and whoever receives it, gets to wear the crown and 'be king for the day'. That person also has to provide the cake the following year.

I searched online for recipes and ended up using a mix of two Galette des Rois recipes, from BBC Good Food and Food Network. I modified the recipes (see mine below) because I don't like almond extract, and I didn't have apricot jam on hand, but I felt like dark rum fit this traditional European style of cake.

Both recipes called for store-bought puff pastry, which I did not have on hand, so I looked for a recipe and ended up using the one at this link: http://www.foodnetwork.com/recipes/quickest-puff-pastry-recipe.html which worked out beautifully - with the egg wash on it, it was flaky, layered and, well, a perfect puff pastry.

In my household, this cake was an absolute success - the kids loved it, my husband loved it and I certainly enjoyed a large piece myself (despite those nagging thoughts about getting fit in January lingering in my head).

So here is the recipe that I made, modified from the two above:

Recipe: Galette des Rois

Ingredients for the almond cream ('frangipane' cream):

1 cup of butter, softened
1 cup of ground almonds
3/4 cups sugar
4 tbsp. of all-purpose, unbleached flour
3 eggs
1/8 tsp sea salt
1 tbsp. dark rum

Puff pastry: store bought or find a great recipe here.

Instructions:


1. Preheat oven to 450 degrees.

2. With a stand mixer, mix all the ingredients for the almond cream until just blended.

3. On a slightly floured cold surface, cut two 9" circles (about the size of round dinner plates, or use a pie plate or the bottom of a springform pan flipped upside to cut your circles). Put one of them on a baking sheet lined with parchment paper.

4. Brush one inch around the edge of the circle with egg wash (beaten egg yolk). Spread half of the almond cream on the center (leaving the 1" edge without cream) and place the second circle on top. 

5. Press all around the edges to glue them together with a fork. Press softly in the center to evenly spread the filling.

6. Decorate the galette with a knife, and make any design that you like.  Search on Google for Galette de Rois images to assist in design, or simply make curved lines to the centre as I have - it baked very well and looked quite nice.

7. Brush the top of the pastry with egg wash, but DO NOT get any on the sides that you pressed with the fork.

8. Put the galette in the centre of your preheated oven and bake for 15 minutes, then turn the oven temperature down to 350 degrees and bake for 25 more minutes. Keep the cake in the oven and simply pull the rack out to sprinkle with icing sugar, then bake for five more minutes. 

Serving:
  • Serve warm or at room temperature with a crown on top.
  • Tradition says that you should cut enough pieces in advance for every person at your dinner, plus one piece, which is reserved for the 'first pauper to appear at the dwelling' (ref). You can also tuck a toy inside one piece for the tradition of King for the day.
Storing:

Do not wrap this cake in plastic wrap, or you will lose the wonderful flakiness of the pastry.

Remaining Almond Cream:

You can use the second amount of cream for a second Galette des Rois, if you have enough dinner guests (i.e. more than 8) or if you have enough puff pastry. Alternately, place the almond cream on any left over puff pastry and sprinkle on some raisins, then roll it up and cut one-inch rounds (like cinnamon rolls) and you will have an excellent Pain au Raisin to bake in the oven for 15 minutes at 375 degrees F.

Next year, I absolutely MUST make a chocolate Galette des Rois, like this one: http://www.ledicodesfilles.com/tag/galette-des-rois-au-chocolat/.

Saturday, January 3, 2015

Festive Chocolaty Cake with Chocolate Pinecones


I made a very festive, holiday season-style cake for a customer who was having a New Year's Eve party. This chocolate cake was very rich and covered in a semi-sweet dark chocolate ganache (a cream and chocolate mixture), and it was decorated with vines and leaves made of dark chocolate toffee, and chocolate truffle 'pinecones' for a festive flair.

What's inside?
My special Raspberry Dark Chocolate Truffle Cake recipe was used for the base of the cake (sorry, I can't share, it's a business secret and served at a local restaurant, but you could use any of the Flourless Chocolate Cake recipes from my chocolate blog site here under the 'Chocolate Brownies and Cakes' section).

Inside the pine cones I used pinecone-shaped dark chocolate mint truffle, otherwise called chocolate paté.  You can find the recipe here - choose any of the three flavours of patés to put inside, just make sure you cover them with a good coating of dark chocolate ganache so you can't see the white or milk chocolate when you cover your paté in chocolate chips to get a pine cone look. A flatter chocolate chip works well (check at a bulk store for flatter-shaped chips, like Callebaut brand), but any will do.

How to make the Pine Cones:
Simply shape your paté on a half-egg shape, then cover in a coating of ganache. Let the ganache set in the fridge for a half hour. Press chocolate chips into it in straight rows across the 'pine cone'. Use bigger chips at the back and smaller at the thinner end. If you make the shape more like a sphere (i.e. with a plumper middle) you will have something that looks like a hedgehog.  Feel free to use the same method to make hedgehogs instead!

Happy Baking (or should I say 'Caking') in 2015!

Tuesday, December 16, 2014

Elsa Cake for a Frozen Birthday Party


Like most little girls, does your daughter love Elsa from the Disney movie Frozen?  Mine does, which is why I was talked into making an Elsa cake for her Frozen-themed birthday party. 

So I got out some Duff blue food colouring, some edible gold and silver food spray and got to work.

The dress portion of the cake was an angel-food cake with an icy mint buttercream. Under the 'snow' lay a Flourless Icy Mint Chocolate Truffle Cake, which was absolutely delicious.  The blue icing was also a minty buttercream.

I used white fondant for Elsa's sleeves and I took apart and washed my daughter's doll for Elsa's upper body.  Let's face it, the hair colour on those doll's are a perfect match, so why try to recreate it in gumpaste?  I used buttercream icing to slick her hair back and get a good 'Elsa braid'.

The shimmering effect was created by edible gold and silver food spray that I found in the cake section of Michael's. The beads were candy pearls.

I also made a small Olaf out of gumpaste and a large Olaf out of cardboard for a blind-folded "Place the Nose on Olaf"  game.  A roll of Frozen wrapping paper helped with the table decorations and an icy style tree that I got at the party store.

The party was a success!

Here is a photo gallery of how the cake came together:


Sunday, December 7, 2014

Curling Cake for a Curling Enthusiast


Winter is here and that means avid curlers are hitting the rinks. So perhaps it's time to make a birthday cake with a curling theme for that curling enthusiast in your life.

This curling cake looks simple but was actually quite complex. First I had to cover the cake in white fondant, then cut circles with sharp-edged bowls and glasses to get the rings on the ice surface.  I rolled out both blue and red fondant to create the exact same-sized rings to insert into the white fondant. This gave it the smooth surface of a curling rink.

Small pieces of grey-coloured fondant were used to make the stones (rolled into balls and then pressed with a thumb to get the right shape) and red and blue fondant for the handles.  You can add people made of gumpaste and the brooms for a more elaborate cake.

Tip:  Do not make this cake in July or in high temperatures - your blue or red fondant may leak food colouring down the sides of the bright white cake.

Sunday, November 9, 2014

Rustic Fall Leaves Wedding Cake with Copper and Eggplant Purple

This Fall-wedding cake was all buttercream, so it was truly delicious.  The copper and eggplant leaves were made of coloured gumpaste and lightly coated with edible silver and gold glitter sprays.  The swooshing vanilla buttercream gave a rustic feel to the cake.  And with no fondant covering the cake, it was that much tastier.

What's Inside?  The bottom tier was 'from-scratch' chocolate cake, layered with creamy semi-sweet chocolate ganache and lot's of organic milk chocolate chips. The top tier had layer of vanilla cake with pumpkin-spiced buttercream.
 
An all-chocolate interior made this cake super tasty.

Rustic Fall Wedding Cake with Vanilla Buttercream and Copper and Gold Leaves.


Tuesday, October 28, 2014

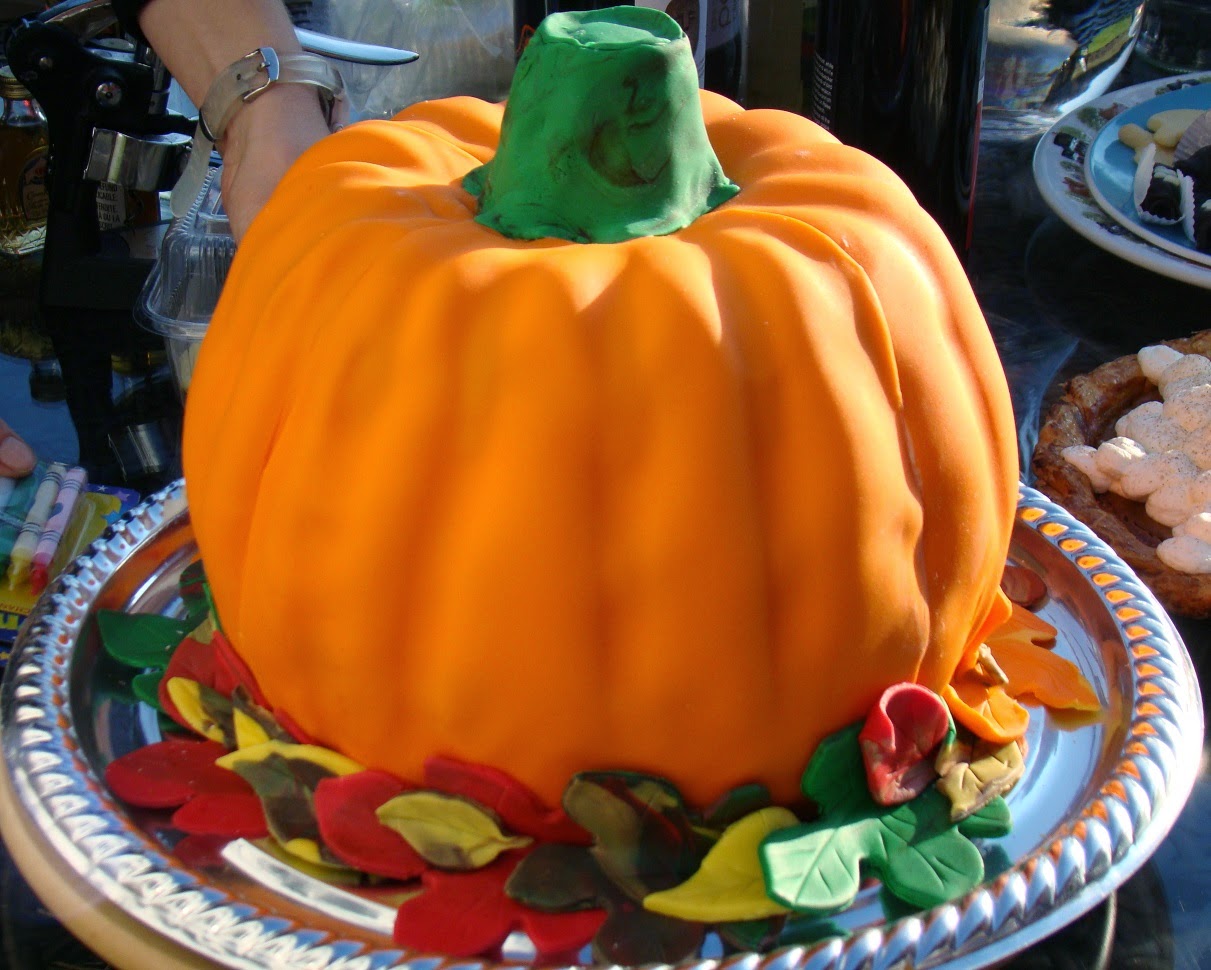
Halloween Cakes: Fondant-Covered Pumpkin Cake

There are just a few days left to make the Halloween Cake that you've been stressing about.  Well, stress no more!  Here is a simple way to make a pumpkin-shaped cake.

This Fondant-Covered Pumpkin has four layers of moist vanilla-chocolate chip cake inside and pumpkin-spiced buttercream. It was covered in Duff's brand of orange fondant, which both tastes great and has really good coverage (and it NEVER cracks! I am not paid to say these things, I have just tried so many types of fondant and been disappointed so many times, but Duff's truly is the best and has the most 'awesome' colour range. Plus, I am a long-time fan of the show Ace of Cakes and know that if Duff recommends it, it must be good!).


How can you make a pumpkin-shaped cake?

There are two ways:

1. Bake a cake in two bundt pans and then flip one upside down, ice in between and then press together, matching up the grooves.  Ice the outside and cover with fondant.

2. Bake four thick layers of cake in 8" or larger pans. Layer with buttercream, and then carve the whole stacked cake into a pumpkin shape. This is not as easy as option one, but you can add more buttercream this way, and it is the best option if you do not own a bundt pan! 

For the stem, make a cupcake and place upside-down in the top of the 'pumpkin' or shape rice treats into a stem shape, then cover with green or brown fondant, or melted chocolate.

For a jack-o-lantern cake, use black fondant to cut the mouth, eyes and nose. Stick them on to the front of the cake with a tiny amount of water onto the back of the fondant.

Happy Halloween!